
System Options
Version: 2020.01
April 2020
INTRODUCTION
The rights to maintain a firm’s overall Practice Management (PM) system is usually reserved for the GreatSoft Administrator Role. The Administrator centrally manages the firm’s PM system setup and Employee Security, after initial setup and customisation by the GreatSoft Consultant.
During implementation, the GreatSoft consultant sets up the firm’s designated PM Administrator(s), who from time to time will refine and update the system, as the software is used and becomes familiar, and as the firm and peoples’ roles change and new Employees join the firm.
This Administrator: System Options Process Guide offers an overview of how various System Option settings affect the way in which functionalities across the PM system can be centrally managed to ensure consistent practices among your firm’s users. The number of possible customisations are endless and continuously evolve, but the below discussions demonstrate the needed principles.
The detailed GreatSoft CRM Practice Management User Guide, also available on the GreatSoft FTP site, offers guidance on any topic referred to in this guideline.
Administrators can contact our GreatSoft Support Team for assistance as necessary.
RELATED PROCESS GUIDES
1. PM Login and User Profile Settings: This Process Guide offers information with regards to logging into the GreatSoft PM software to ensure a continued and safe online experience.
● Contrary to the Administrator’s overall Role, the Profile Settings guideline explains how a logged in user can customise the PM interface to personal preferences.
2. Customising the PM Dashboard Process Guide: This Process Guide aims at enabling a logged in user to edit the display/layout of the PM Dashboard to personal preferences.
3. Administrator: Employee Security: This Process Guide offers an overview of how user access and rights to PM applications across the system can be managed. A practical example is used for illustration purposes.
4. PM Maintenance: New Employee: This Process Guide aims at enabling you to add/create and set up a New Employee record, and to edit an existing Employee.
5. Standard Tasks Maintenance & Client Tasks: This Process Guide aims at enabling you to create and maintain Standard Tasks, to add them to Clients, and to customise/set up Client Tasks in order to capture chargeable Timesheets and Disbursements, representative of the work done for your Clients, and to subsequently generate the applicable WIP reports and to raise the relevant Fees.
6. Upcoming: PM Maintenance: More PM Maintenance Process Guides will follow to offer overviews of how the various Practice Management applications can be centrally managed to ensure consistent practices among your firm’s users. Currently, these topics are covered in the CRM User Guide.
FIRM WIDE PREFERENCE SETTINGS
1. The Administrator is responsible for how PM is set up to ensure overall consistency among all users in the firm, as determined by the firm’s policy makers.
2. These settings are mainly controlled 3-fold and accessed from the Settings drop-down Menu on the right-hand side of the Menu Bar:
a. Administration (Administrator: Employee Security Process Guide).
b. System Options (scope of this Process Guide).
c. PM Maintenance (topics are currently widely covered in the GreatSoft CRM Practice Management User Guide, Upcoming: Series of further PM Maintenance Process Guides).
NOTE: The Administration and System Options menu items are only visible to logged in senior staff, who are assigned to the Administrator Role.

GETTING STARTED
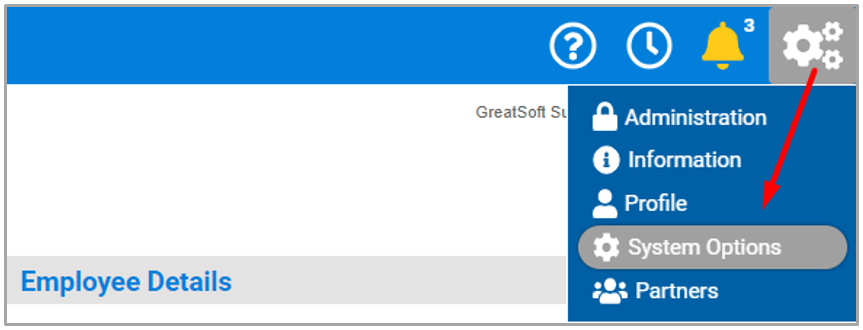
1. Access the System Options page from the Settings Menu to the right-hand side of the PM Menu Bar, by hovering across the Settings Menu shortcut and select System Options.
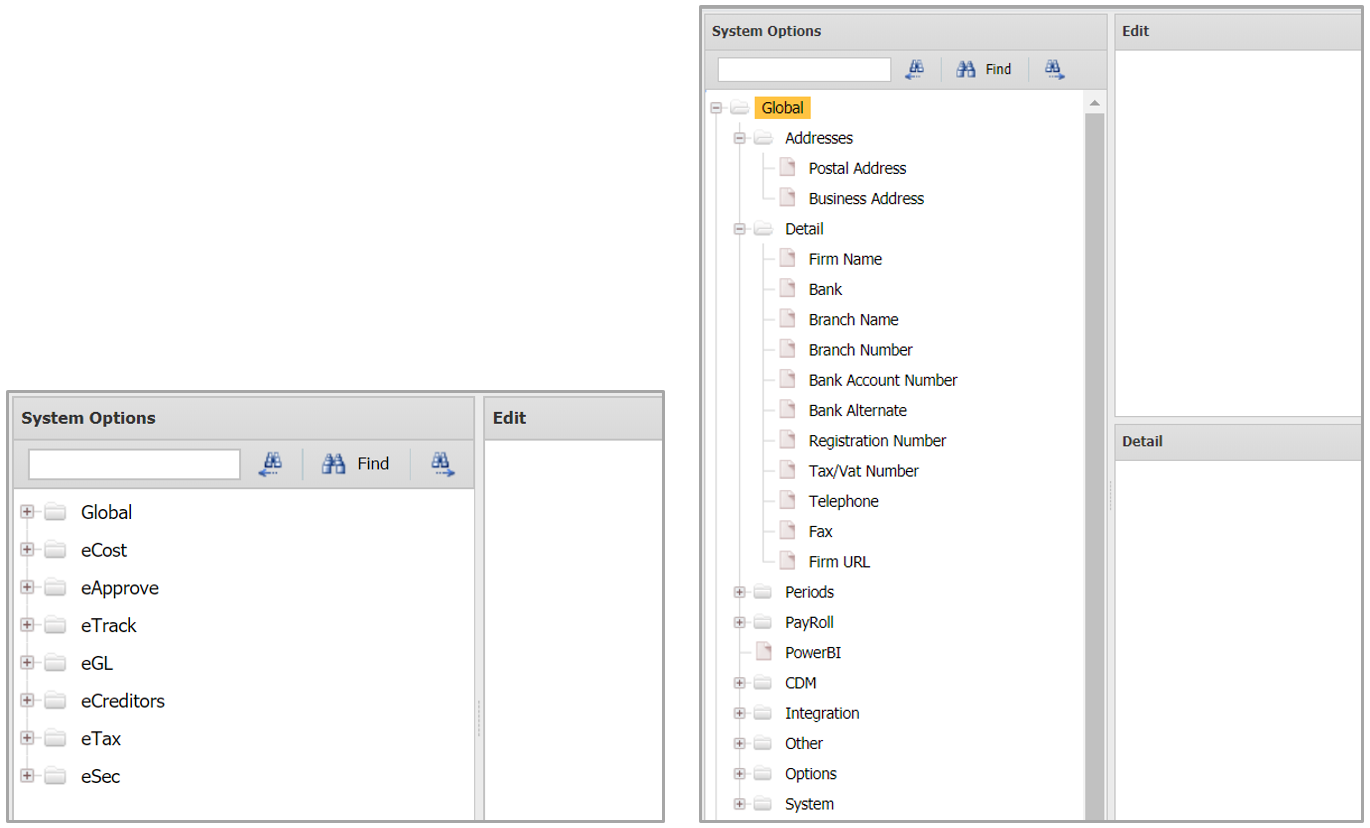
2. The System Options landing page opens the main System Option categories (image left) from where you will drill in to unhide the specific System Options and sub-Options to locate the desired (image right).
3. Use the convenient Search function for locating a specific System Option, especially if you don’t know the main category and/or the specific name of the Option.
a. Type the relevant keyword(s) in the Search field (1) and then first click on the Find button in the middle (2), followed by the Next/Downwards button (3), until you find the desired System Option, e.g. Timesheet Frequency per illustration (5).
b. To search upwards in the list, click on the Back/Previous button (4).
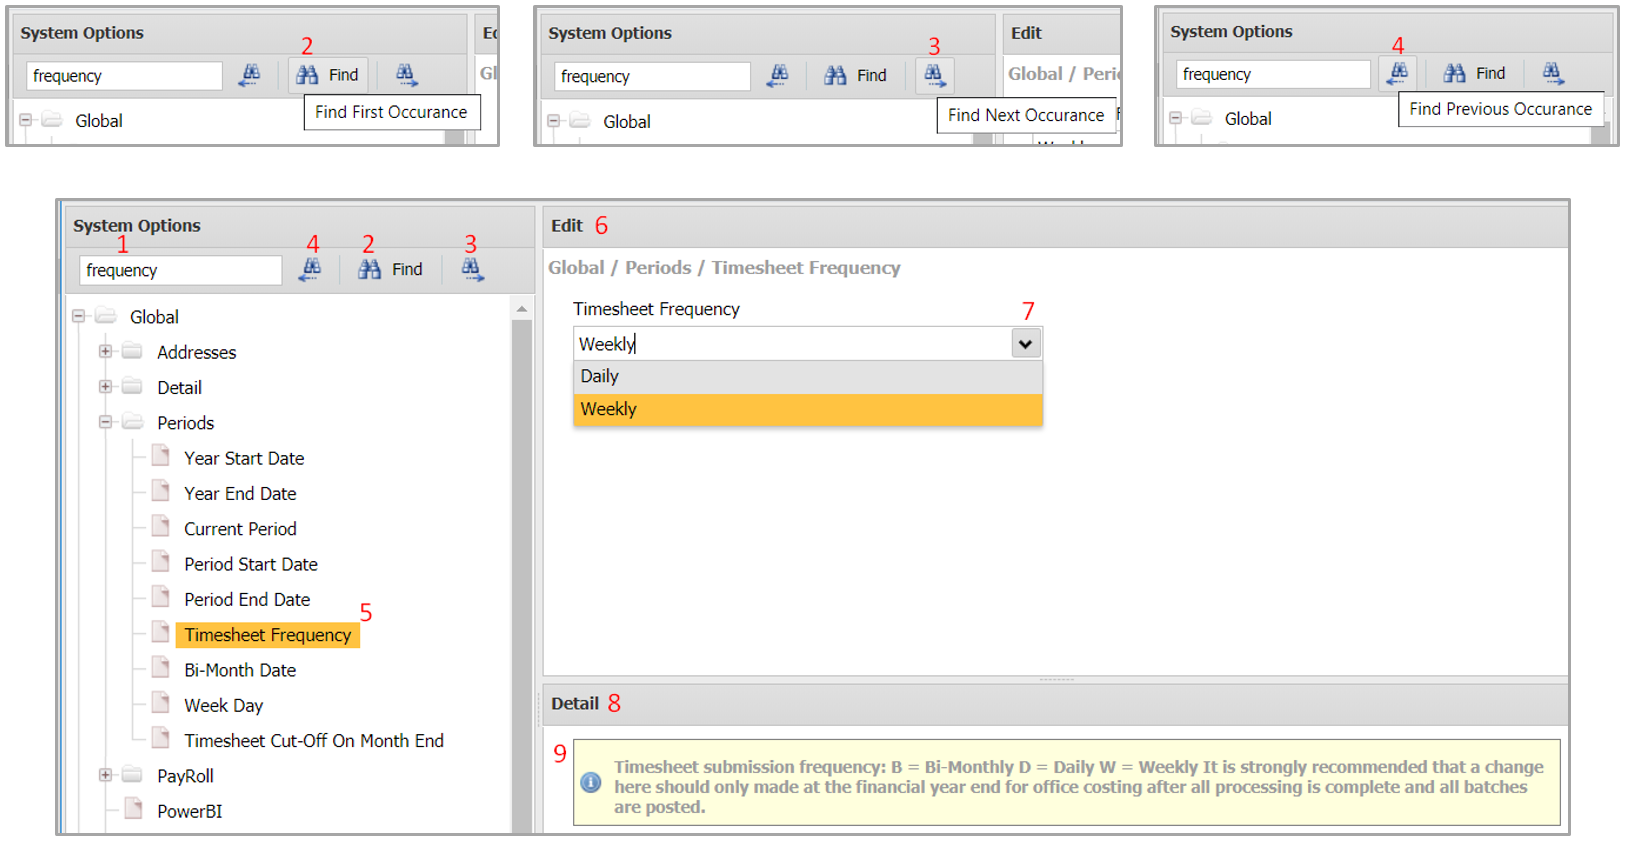
4. The Edit section (6) is customised through different types of actions/settings (7), as per the guidance (9) provided in the Detail section (8), such as:
a. YES/NO to Enable/Disable a setting, respectively.
b. Selecting the preferred item from the available lookup list, e.g. Daily/Weekly as per the Timesheet Frequency example (7).
c. Selecting a Date from a popup Calendar.
d. Manually capturing a value or text.
e. Multiple settings on a table/matrix, e.g. to define custom settings across multiple Offices.
● The Detail section that offers guidance on the selected System Option often indicates which System setting is the default.
5. You will receive confirmation when a System Option has been changed.

SYSTEM OPTIONS CUSTOMISATIONS
ILLUSTRATIONS OF THE IMPACT OF SYSTEM OPTIONS ON PM APPLICATIONS
The next examples demonstrate the effects of four System Options settings across board when the firm’s logged in users work in the related PM application.
NOTE: The individual Process Guides and/or the comprehensive Practice Management User Guide offer in-context guidance on setting up relevant System Options and how they would impact on the applicable PM functionalities.
(1) e-Approve | Fees | Allow Negative Fees
1. This System Option allows or disallows negative Fee capturing. The default is YES.
● System Option to Allow Negative Fees is disabled.
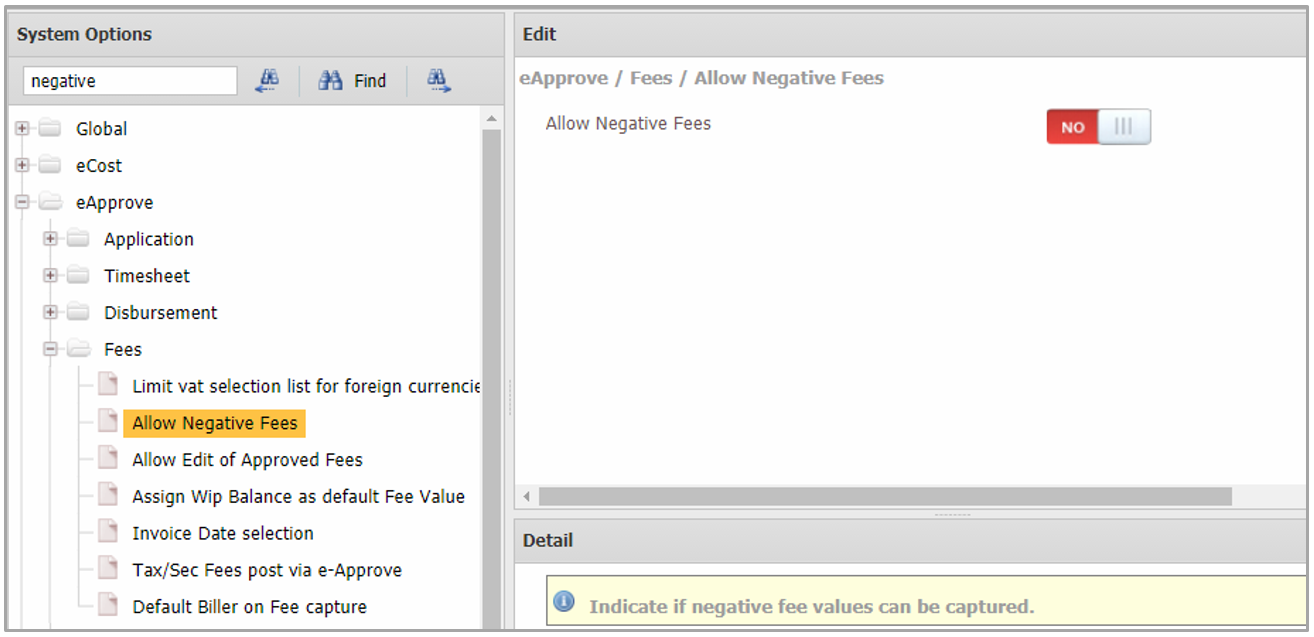
● User feedback when trying to capture a negative Fee when the System Option to Allow Negative Fees is disabled.
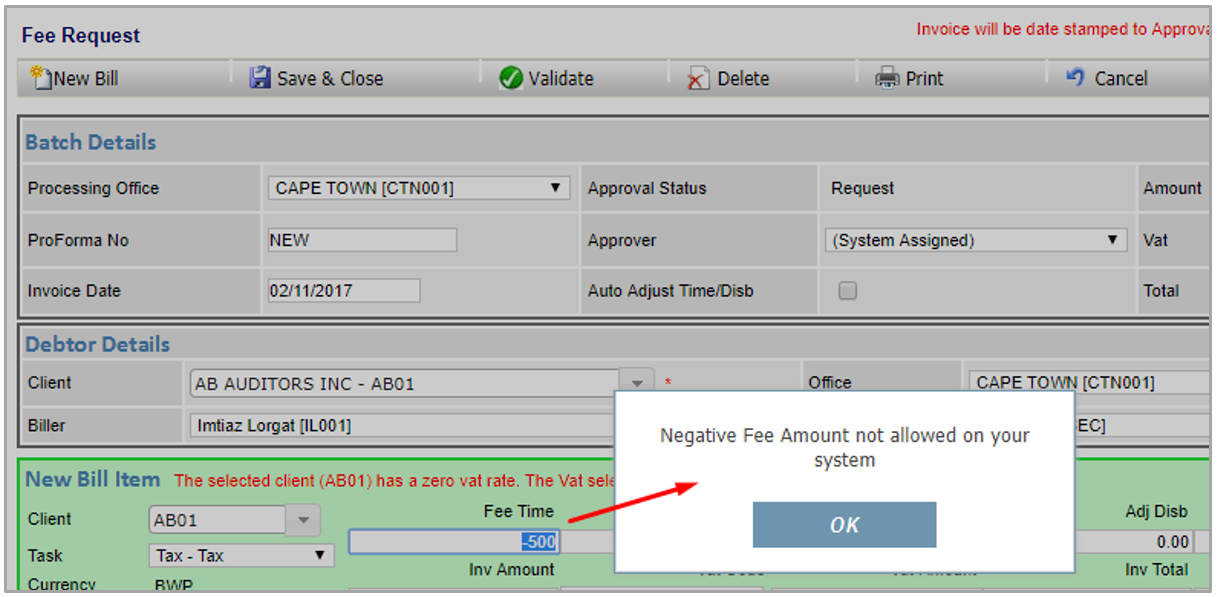
○ Contrary, when disabled (NO), a negative Fee will be allowed during capturing.
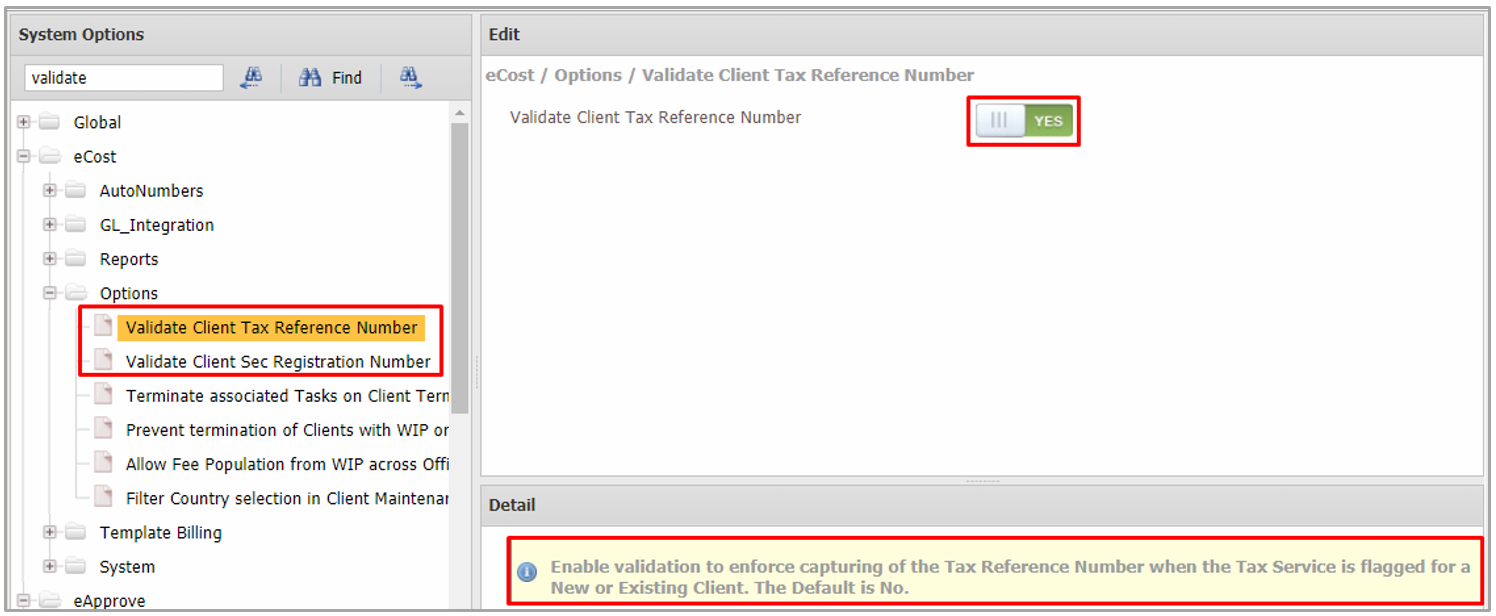
(2) eCost | Options
1. Two System options accommodate practice preference when flagging Tax and/or Sec Services on a new or existing Client record, i.e.:
a. Mandatory Client Tax Reference Number, and Two System options accommodate practice preference when flagging Tax and/or Sec Services on a new or existing Client record, i.e.
b. Mandatory Client Sec Registration Number.
2. The default of each is NO.
3. If enabled, the user will be prompted upon saving a Client record to capture Tax and/or Sec Registration numbers that pass the validation requirements.
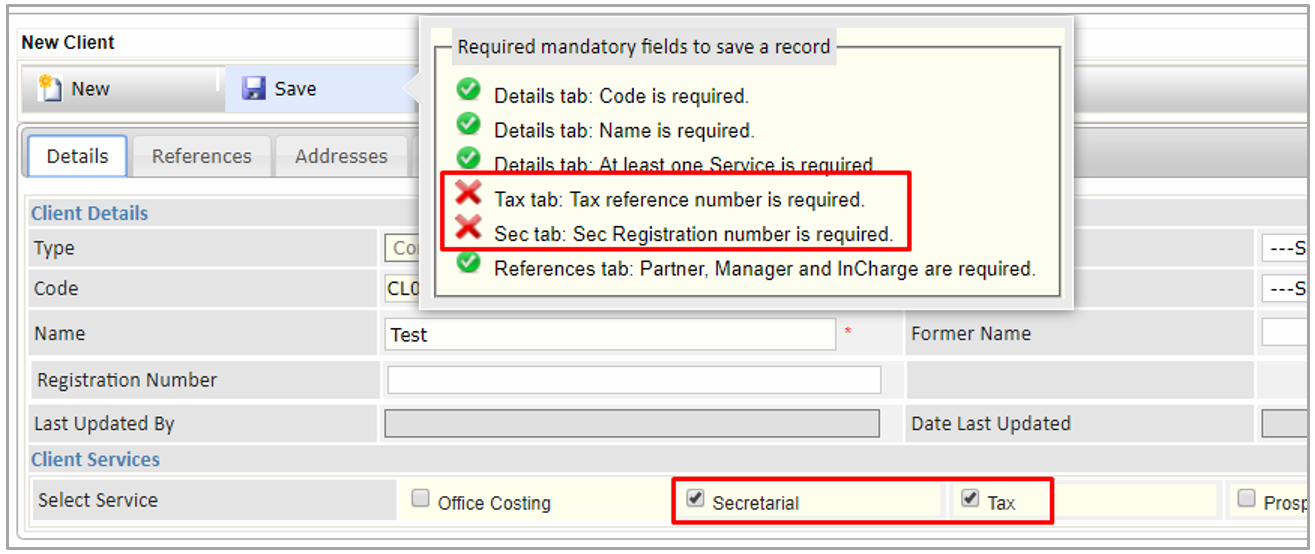
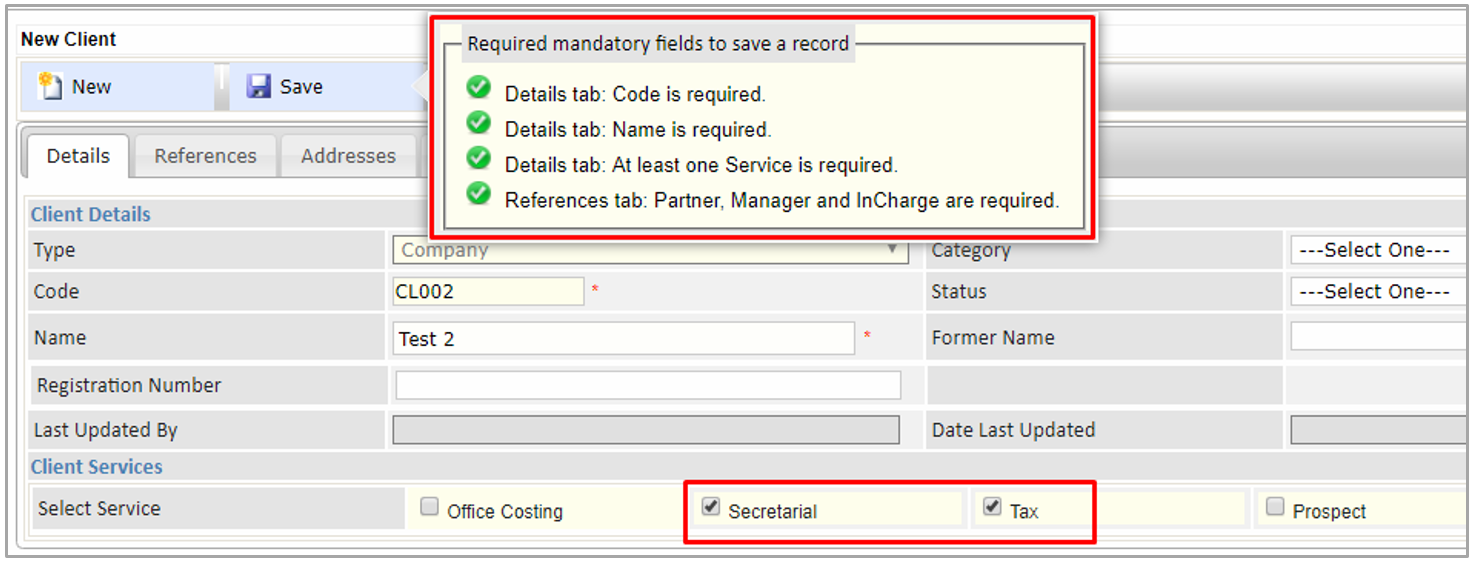
● The Validate Tax Reference Number and Sec Registration Number System Options with the highlighted option in the illustration being enabled (YES).
● Client Maintenance pre-Save validation messages when the Validate Tax Reference Number and Sec Registration Number System Options are enabled and the Secretarial and Tax Services are activated on a Client record.
○ These bullet points will not show if the Secretarial and Tax Services are not activated.
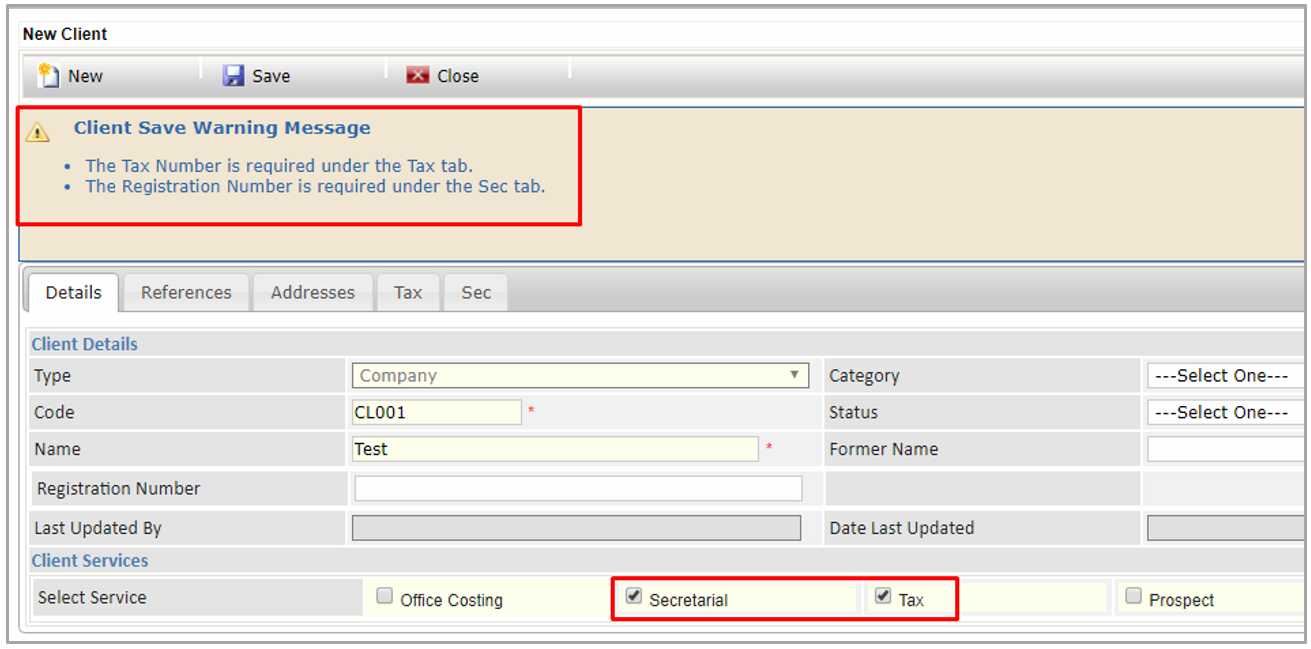
● Client Maintenance post-Save validation messages when the Validate Tax Reference Number and Sec Registration Number System Options are enabled and the Secretarial and Tax Services are activated on a Client record.
○ These bullet points will not show if the Secretarial and Tax Services are not activated.
● The Validate Tax Reference Number and Sec Registration Number System Options are disabled (NO).

● Client Maintenance pre-Save validation messages when the Validate Tax Reference Number and Sec Registration Number System Options are disabled and the Secretarial and Tax Services are activated on a Client record.
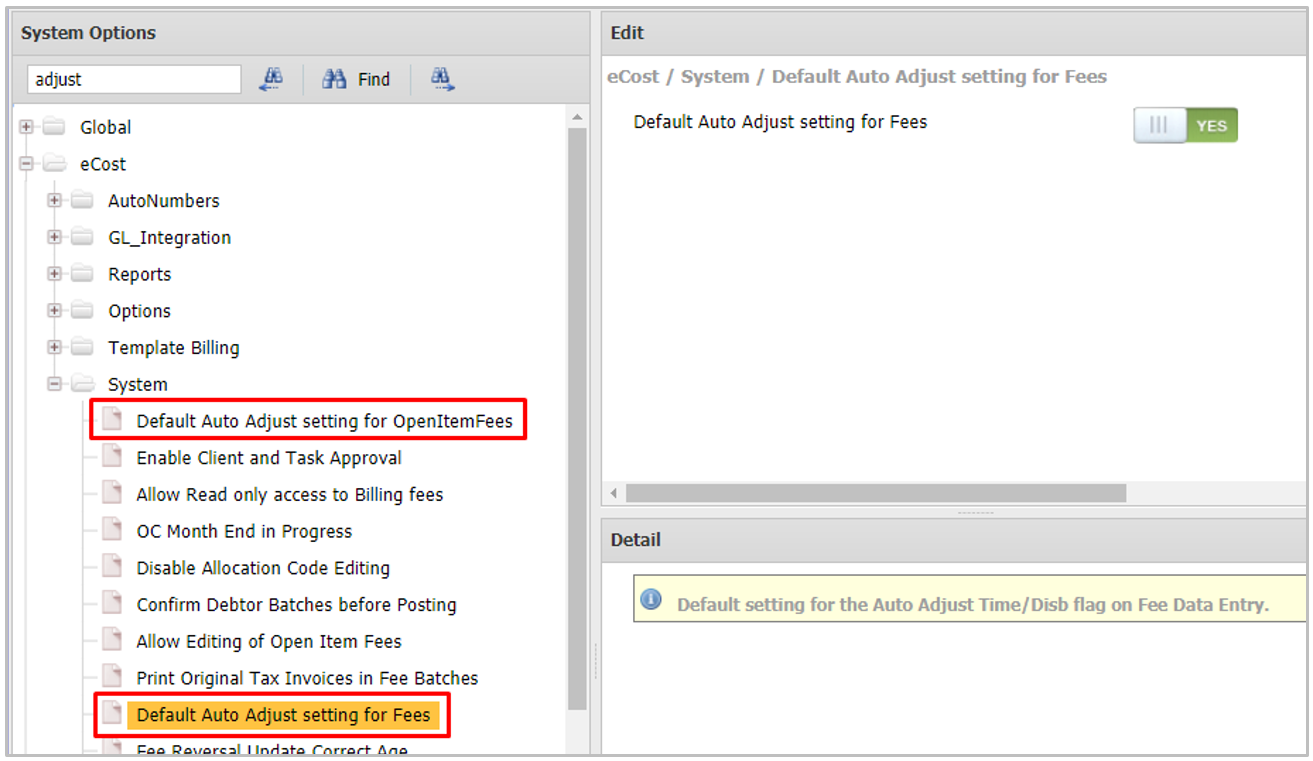
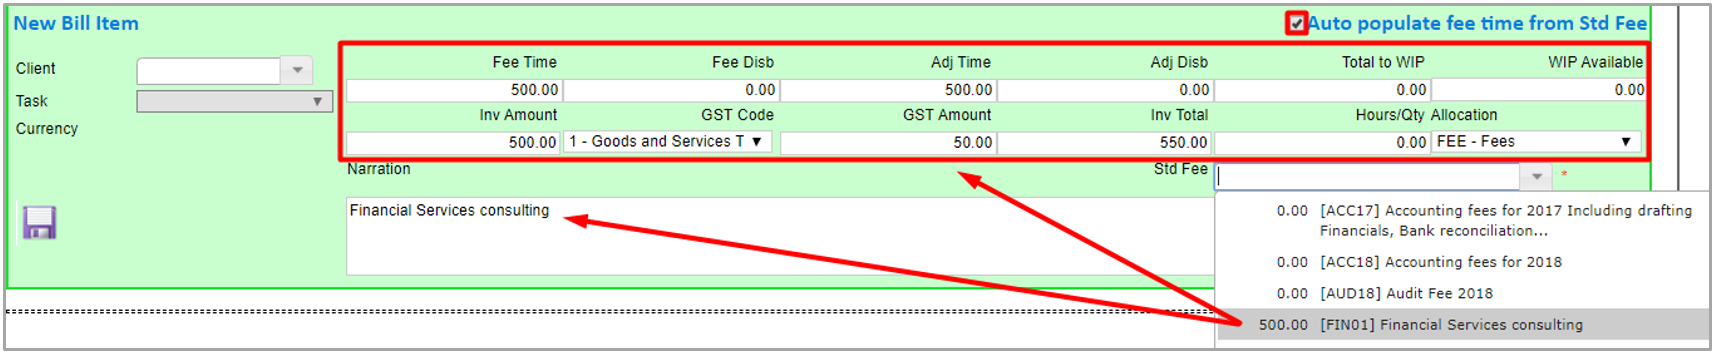
(3) Default Auto Adjust setting for Fees
● When the Default Auto Adjust setting for Fees System Option is enabled (YES) and the Auto populate fee time from Std Fee checkbox ticked on the New Bill Item section of a Fee, the applicable fields of a Standard Fee automatically populate from the selected Std Fee.
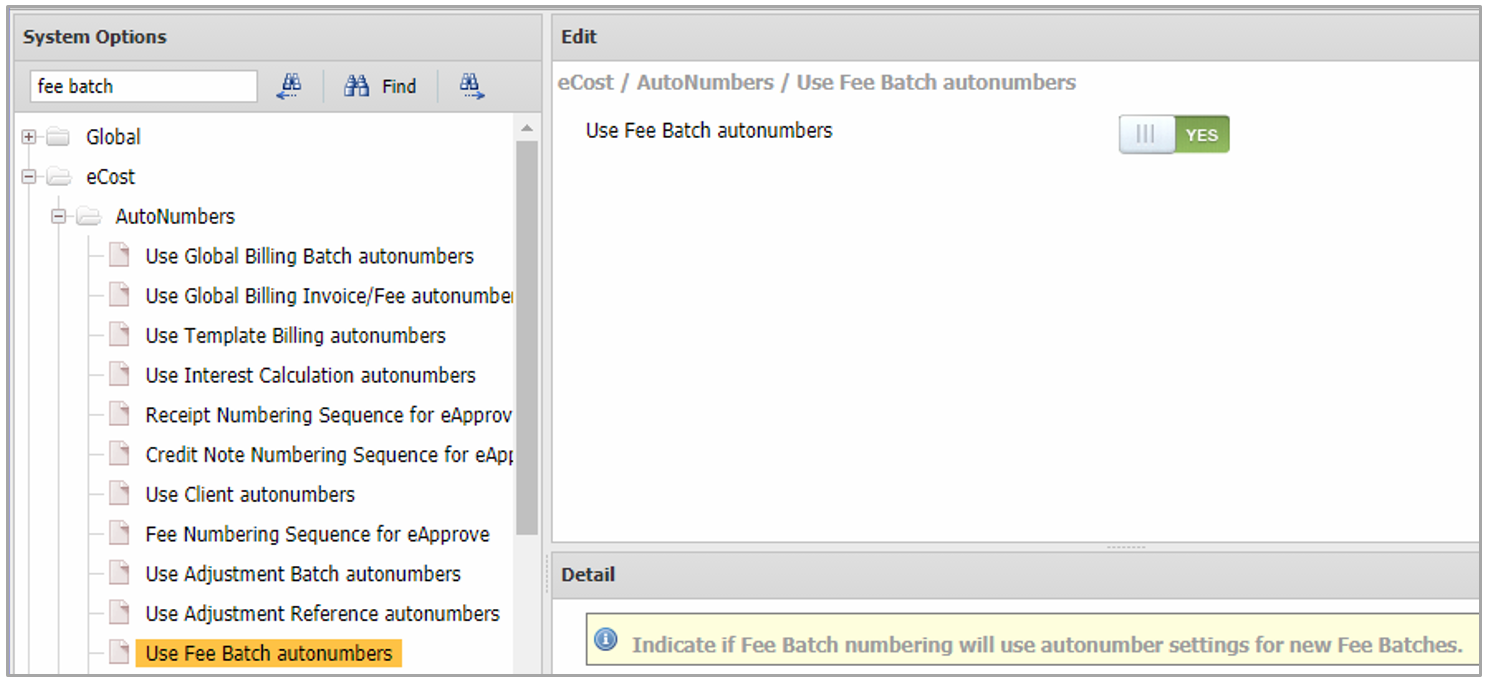
(4) Batch Autonumbering
NOTE: The Administrator must first set up Autonumbering for the different areas under PM Maintenance | Auto Number Setup for this to work.
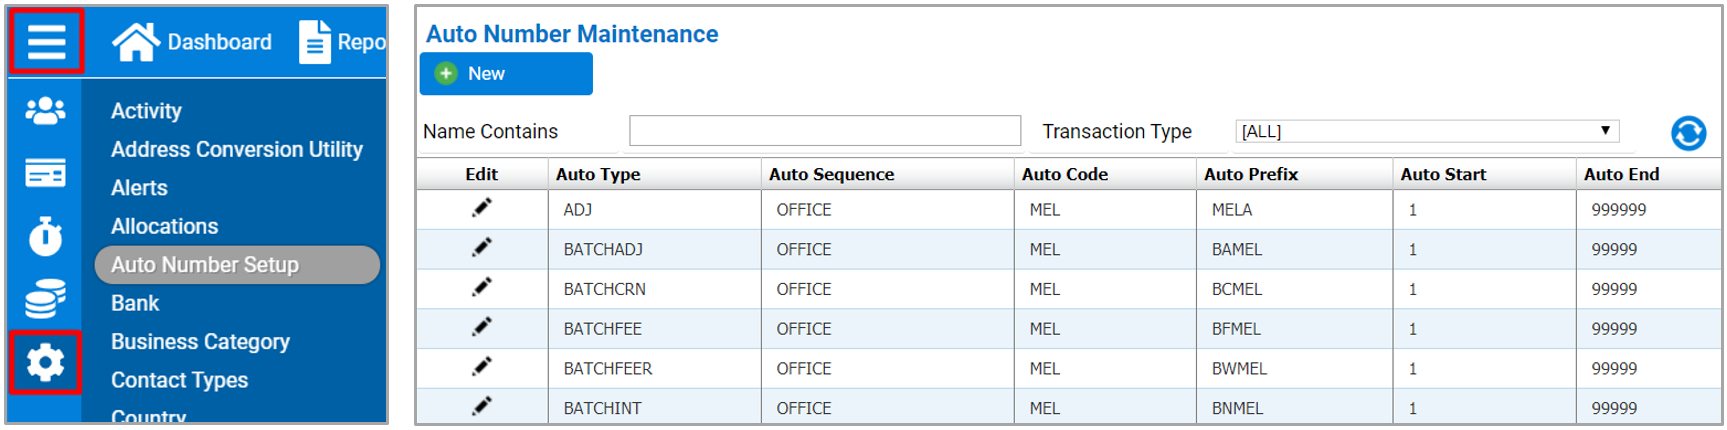
1. Autonumbering across the different Processing functions work in the same way when Batch and/or Reference Autonumbering are enabled / disabled.
a. When enabled, the field displays the default, “NEW” and automatically generates the number (next available number in series) upon saving. The Batch number will populate when the first entry in the Batch is saved.
● The user cannot manually capture/override it.
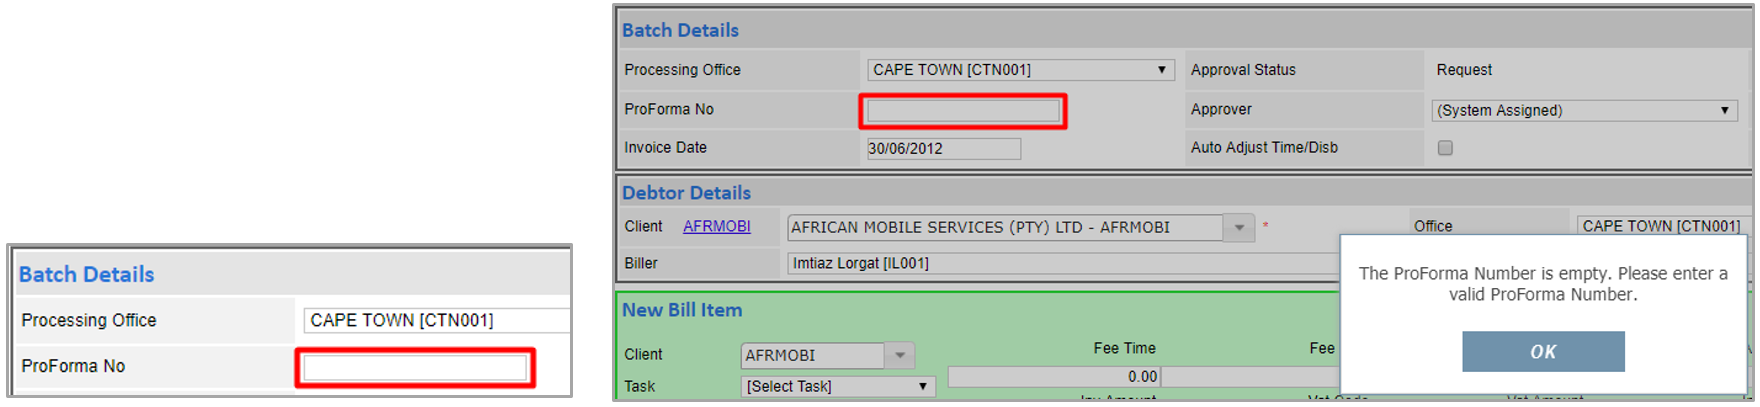
b. Where a Batch and/or Reference number requires manual capturing, the field is empty and will the user be prompted to capture the number when trying to Save the record without a number.
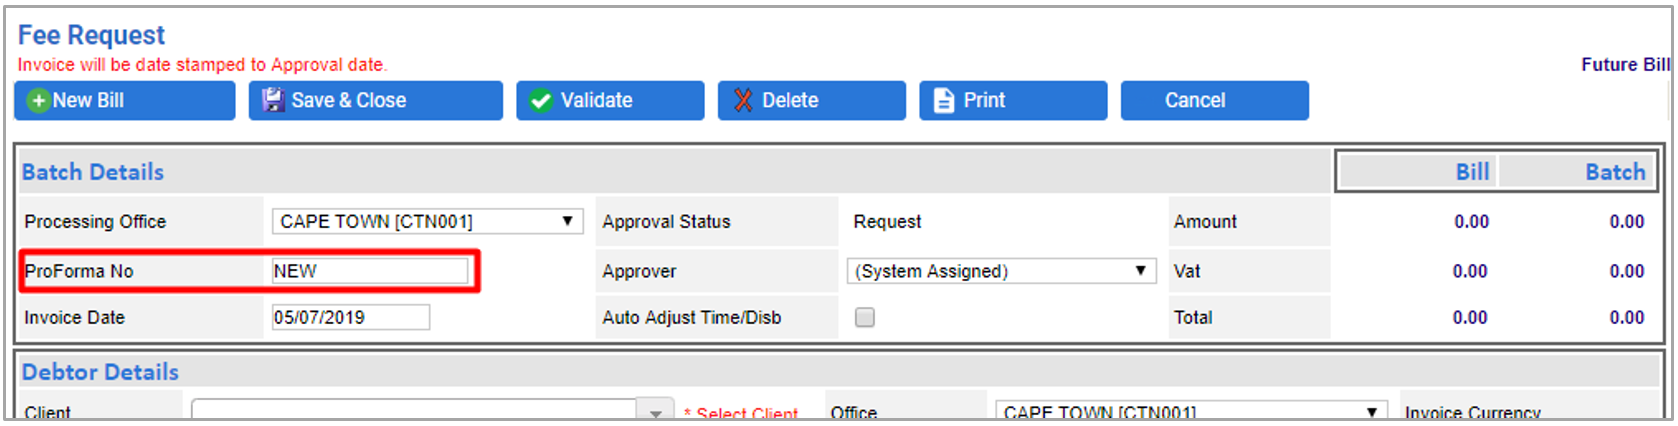
● Enable Fee Batch Autonumbering System Option.
● The Proforma No field shows NEW if the Fee Batch Autonumbering System Option is enabled and will automatically generate the number upon saving the first entry.
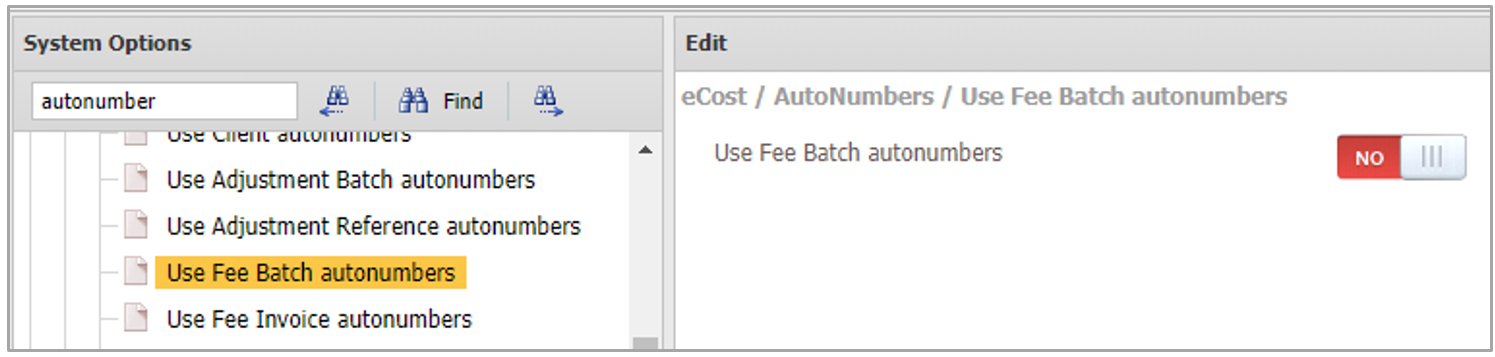
● Disable Fee Batch Autonumbering System Option.
● The Proforma No field is empty for manual capturing if the Fee Batch Autonumbering System Option is disabled. The user is prompted to capture the number when trying to Save without having entered a Number.
EXPLANATIONS OF SOME AVAILABLE SYSTEM OPTIONS PER CATEGORY
The following tables offer guidance on some PM System Options that can be configured by the Administrator.
Global System Option explanations
Global |
System Option |
Descriptions and Values |
CDM |
CDM Upload block size |
Maximum file size (in kB) for attachments uploaded in the Documents tab for PM, Employee, Events, Sec and Tax. The default is 250,000. |
Options |
Validate Terminated Tasks |
Specify whether eCost must prevent the posting of Time to Terminated Tasks. |
Options |
Validate Task Open Date |
Indicate whether the Task Open Date must be validated upon posting Timesheets in eCost. |
Options |
Allow Timesheets across Offices |
Indicate whether staff are allowed to process Timesheets/ Disbursements to Tasks that are attached to another Office. |
Options |
Validate Standard Time |
Select the validation method for Standard Hours: 0 = None, Std Hours will not be checked. 1 = Warn only if Total Hours are less than the Std Hours. 2 = Total Hours must exactly equal the Std Hours. 3 = Total Hours must be at least equal to the Std Hours. |
Options |
Default Contact Type |
Assign a default Contact Type when creating New Contacts via the Client record. |
Other |
Default Timesheet Rate |
Select the System Wide Default Timesheet Rate that will be used for the firm from the lookup list. |
Other |
Travelling Code |
Select the default Disbursement code to be used for Travelling Expenses from the lookup list. |
Other |
Non-chg Disb Allocation |
Select the default Allocation code for non-Chargeable Disbursements. |
Periods |
Timesheet Frequency |
Select the Frequency of Timesheet submissions: Daily: A Timesheet is completed on a Daily basis. Weekly: A Timesheet is completed on a Weekly basis. Bi-Monthly: A Timesheet is completed twice a Month. |
Periods |
Bi-Month Date |
If there are two Timesheet Periods per Month, this will be the number of Days (either 15 or 16 Days is allowed) for the first Timesheet Period. |
Periods |
Week Day |
Specify the Days of the Week, e.g.: Sunday = 1, Monday = 2, Tuesday = 3, Wednesday = 4, |
Periods |
Timesheet cut-off on Month End |
For Weekly Timesheets, indicate whether the last Timesheet of the Month must cut off on the Month End Date, i.e. some Timesheets may then have less than 7 Days. |
eCost System Option explanations
eCost |
System Option |
Descriptions and Values |
System |
Enable or disable Contact Approval |
Enable or disable Client and Task Approval. NOTE: The Approval process is bypassed if a self-Approver creates or edits a Client record or Client Task. |
System |
Enable or disable Client and Task Approval |
Enable or disable Contact Approval. NOTE: The Approval process is bypassed if a self-Approver creates or edits a Contact record. |
System |
Allow users to override Disbursement Rates |
Indicate whether users are allowed to override Disbursement Charge Rates. The default is YES. When set to YES, the Currency and Local fields are enabled for editing. |
System |
Client InCharge must be a Partner |
When set to YES, the InCharge drop-down in the Client record will only list those Employees defined as Partners (for filtering purposes). |
System |
Clear Client File Number upon Termination |
Upon Client termination, automatically remove the Client File Number saved in the Client record. |
System |
Default Interest Flag |
Set the default Interest that will be applied to all New Clients when being created and set up in the PM database. |
System |
Restrict Client/Task Managers |
Indicate whether the Client and Task Manager selections should be restricted to the list of valid Partners, or Managers. |
System |
Allow users to Update Client References to Tasks |
Indicate whether users are allowed to update Task References when changing the Client Office, Client Partner, Client Manager and Client Group. The default = YES |
System |
Show Client Group, Partner, Manager Codes or Descriptions |
Indicate whether either the Codes (if NO) (default), or the Descriptions (if YES) for the Client Group, Partner and Manager must be displayed on the main PM Client Enquiry grid. |
System |
Show Client View Group, Partner, Manager Descriptions |
Indicate whether only the Codes (default) (if NO), or also the Descriptions (if YES) for the Client Group, Partner and Manager must be displayed on the Client View page. |
System |
Disable Allocation Code |
When set to No, users will be unable to change the Allocation Code for the selected Disbursement during data entry. |
System |
Default Auto Adjust setting for Fees |
When enabled and a Standard Fee is selected after having enabled the Auto populate fee time from Std Fee, the applicable fields automatically populate. |
System |
Force Standard Task selections |
Forces users to select Task Codes from the list of Standard Tasks (if YES) and prevents them from adding ad-hoc tasks that were not created in Maintenance Standard Tasks. If disabled, it is possible to create a new Task from within Client Task Maintenance by adding a Task Code, Description and completing the required fields. |
Options |
Validate Client Tax Reference Number |
Enable validation to enforce capturing of the Tax Reference Number when the Tax Service is flagged for a New or Existing Client. The default is NO. |
Options |
Validate Client Sec Registration Number |
Enable validation to enforce capturing of the Sec Registration Number when the Sec Service is flagged for a New or Existing Client. The default is NO. |
Options |
Terminate associated Tasks upon Client Termination |
If enabled, all Tasks are terminated when the Client is terminated. By terminating a Client, all Balances should reflect 0. |
eApprove System Option explanations
eApprove |
System Option |
Descriptions and Values |
Application |
Time/Expense Update to WIP |
Select whether the Time and Expense update to WIP must be initiated by the Approver, or via a Stored Procedure. |
Application |
Allows users to select a Time/Expense Approver |
Indicate whether users are allowed to change the Time/Expense Approver. |
Application |
Validate Security Group for WIP Update |
Indicate if only Security Group members for "Admin" can Update Time and Expenses to WIP. |
Approvals |
Approval Relationship |
List Allocated Approvers for the Employee List in Approvals. Approval Relationship:
|
Approvals |
Load Allocated Approvers |
If YES = Employee List for an Approver only shows TS Employees that nominated the Approver. If NO = Employee List for an Approver shows All TS Employees. |
Fees |
Allow Negative Fees |
Allows or disallows negative Fee capturing. The default is YES. |
Fees |
Limit Vat Selection List for Foreign Currencies |
Zero Vat Billing: Limits the Vat selection when capturing Fees in a Foreign Currency to Zero Vat percentages. The default = NO. When creating a new Fee for a Client set up with a Zero VAT Rate and Foreign Currency (i.e. not the Office Currency), the application will warn the user that the Client uses a Zero Vat %, thus filtering the VAT Code drop-down to Zero Vat Codes only. |
Disbursement |
Submit directly to WIP |
If [YES], all Disbursements will be posted and updated directly into WIP when submitted by the Approver. This option is used when the eApprove | Application | Time/Expense Update to WIP is set to Approver Initiated. |
Timesheet |
Display Charge Rates on Web Timesheets |
Determine whether the Charge Rates are visible on the popup message when hovering over Time fields in Web Timesheets. |
Timesheet |
Maximum number of Hours per Day |
Specify the maximum number of Hours that is allowed for capturing on a single Day. The default = 24, which is also the maximum number of Hours allowed per Day. |
Timesheet |
Capture of Timesheet Units |
Determine whether Time is captured in Hours only (default = 0), or in Hours and Units (values above 0). Default = 0 (0: No units are captured, 1: Each unit = 60 min, 2: Each unit = 30 min, 3: Each unit = 20 min, etc). |
Timesheet |
Number of previous Periods to display upon creation |
Number of Previous Periods to display when creating a new Timesheet/Expense. |
Timesheet |
Allow user to select an Approver |
Indicate whether users are allowed to select an Approver for Web Timesheets and Disbursements. The default is NO. |
Timesheet |
Activate daily Employee Standard Hours |
Activate the Daily Employee Standard Hours. Standard Hours are determined by the System Options per Office, per Day, instead of by the Employee's Standard Hours. The default is NO. |
Timesheet |
System wide Employee Standard Hours - Monday to Sunday System wide Daily Employee Standard Hours |
System wide Employee Standard Hours. The default = 8 for each Day of the Week (Monday to Sunday). The system will use this when the eApprove | Timesheet | Activate daily employee standard hours System Option is enabled. |
Timesheet |
Timesheet Activities by Employee Service Line |
Filter Activities when capturing Timesheets by Employee Service Line, instead of by Task Service Line. |