
Billings Overview
INTRODUCTION
Billings forms part of the Processing functions in GreatSoft Practice Management (PM) and is split into five entry types, i.e. Fees, Open Item Fees, Invoices, Interest and Reversals. They all share common features, as discussed by using the Invoice Billing Type as example in this guideline.
This Processing: Billings Overview Process Guide aims at providing you with an overall understanding of the Billings Processing pages and functions, and at enabling you to navigate to the desired Batches and/or specific Billing items. Without going into much detail, you should be able to open, edit, cancel and save any existing Billing items in single and multiple Bill Batches, by learning about the general features and components of an Invoice and Invoice Batch as example.
Related Process Guides
1. Processing: Billings: Capturing Invoices, Fees and Open Item Billings: This Process Guide aims at enabling you to create and capture new Billings Batches, consisting of single or multiple Billing items, and to submit them for Approval by your assigned Approver.
GETTING STARTED
Accessing the Billings page
1. All PM Processing | Billings functions are accessed through the same Menu path and on the single main Billings page.
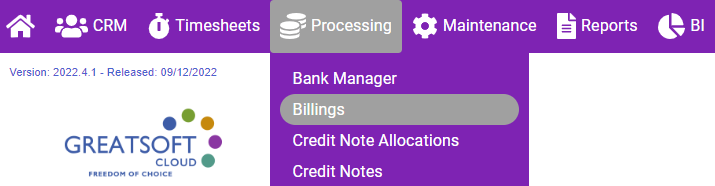
2. Navigate to PM Processing functions from any location in PM, by clicking on the PM Dashboard Menu access button (1).
3. Click on the Processing Menu section to display the available options (2).
4. Click on the Billings Menu option to launch the Billings page (3).
● The default Billings grid view show all Billing Types on one page.
● You can filter to only view a specific Billing Type.
Features of the Main Billings page
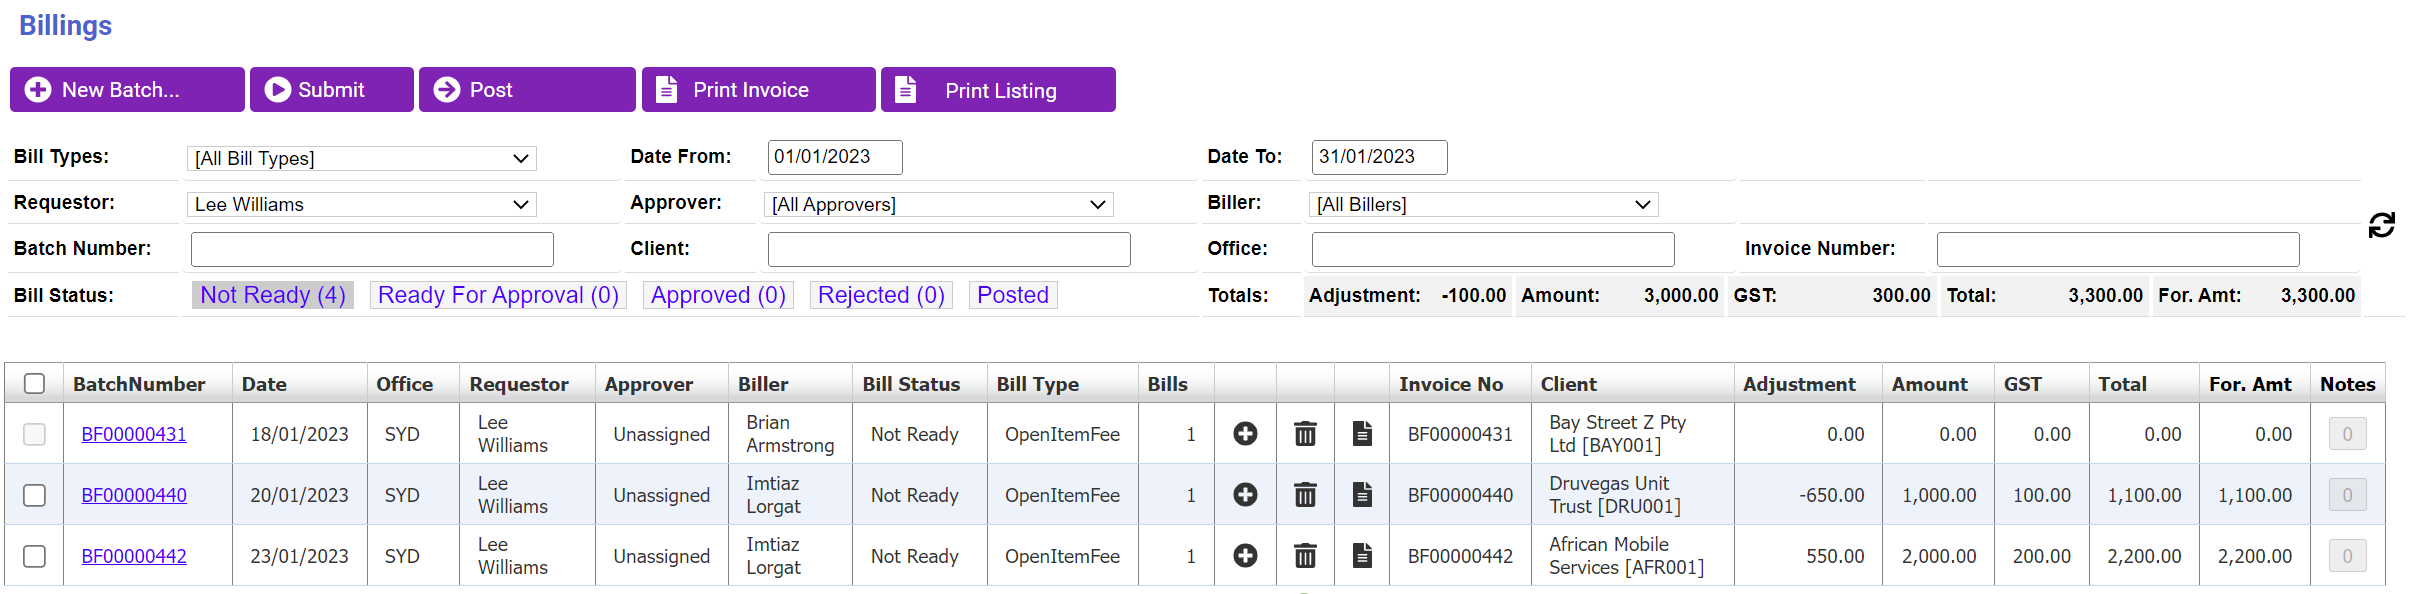
1. The Billings page opens with the default Not Ready (1) Status batches being listed in the grid, as per the default filter selections.
a. The default filter options (2) for Bill Types, Requestor, Batch Number, Approver, Client, Office and Invoice Number are “All”. They can be customised to refine the listed Billings Batches.
b. The default Date range for the selected Bill Status starts From the earliest open Batch Date (3) To the end of the current PM Period (4).
c. Each Bill Status has a counter in brackets that indicates the number of Batches per Status type (5).
d. Tasks that can be performed from the main Billings page include shortcuts for creating a New Batch (6), the Submit (7) for Approval button of selected batches, a Print Invoice (8) button and a Print Listing (9) button.
● All of the main Processing pages each has a Print button for Batch Listings Reports (9). This enables the user to directly open the relevant Batch Listing Reports, instead of having to open each batch to print from there.
e. The following features and information are available per Batch in the grid:
i. The first column to the left allows for the selection of a single, or multiple Billings batches by clicking on the individual checkboxes (10), or for a Select All (11), by clicking on the checkbox in the column heading, in order to Submit selected Batches for Approval.
ii. The BatchNumber column lists the Batch Numbers with hyperlinks to open each Batch for viewing and/or Editing.
iii. The next columns to the right offer information about each Billings Batch with a single view. To name a few:
● The Requestor is the originator of the batch.
● The specific Approver’s name will show if specifically assigned by the Requestor, or when left for the system to assign, it shows as Unassigned.
● The Bill Type shows the 5 x different Billing Types if the Bill Type filter is left as the default “All”.
● The Bills column shows the number of Billings per Batch.
○ The first and third batches each has a single Invoice (1) (13)
○ The second batch has multiple Invoices (2) (12).
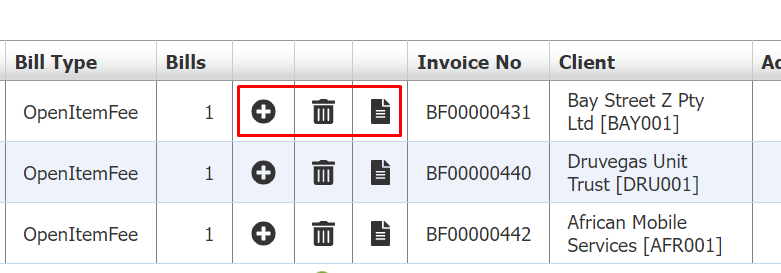
● The next 3 x columns offer shortcuts for (1) Creating a New Bill in an existing Batch, (2) for Deleting a Batch, or (3) for Viewing the relevant Invoice when the Batch only has a single Bill (14).
● The last columns to the right of the grid summarise the financial information (15).
Viewing and Editing an existing Billings Batch
1. To view an existing Billings Batch, click on the BatchNumber hyperlink to the left of a Batch.
2. A Batch can have multiple Billings items (e.g. Invoices), or a single one.
● A multiple Billings Batch opens an interim List of Bills in Batch grid.
● A single Billing Batch directly opens the Bill, e.g. Invoice.

Multiple Entry Batch: Interim List of Bills in Batch page
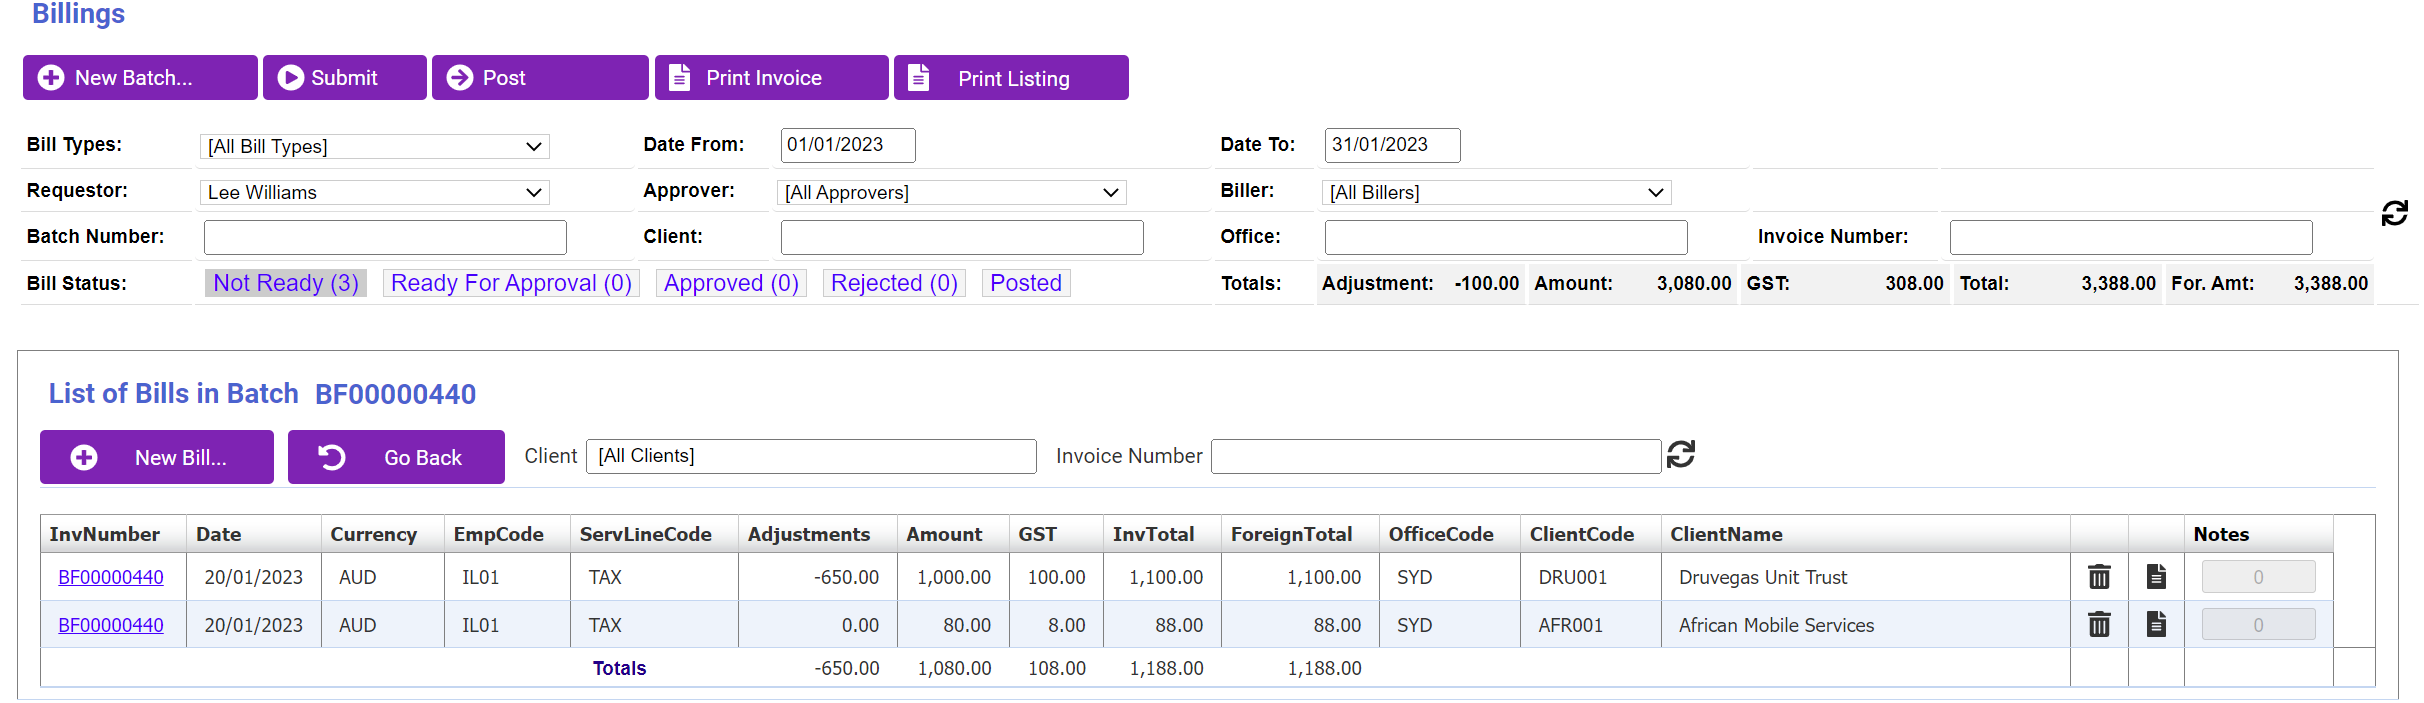
1. When a Batch consists of multiple Invoices/Billing items, an interim List of Bills in Batch (1) opens, with the following main features:
a. The Batch Number shows in the heading (2).
b. All Invoices in that Batch are listed in the grid.
● Each row in the grid summarises the Invoice details, i.e. Invoice Number, Date, Currency, Employee who captured the invoice, the Amounts, Client and Office Codes, and the Client Name (3).
● Shortcut buttons are available from where to delete or view an individual Invoice (4).
● Refine the displayed Billings by filtering for a specific Client (5) and/or Invoice Number (6). Click on the Refresh button to apply (7).
● When you click on any Bill Status (8), the page returns to the main Billings page.
● To open an Invoice, select the InvNumber hyperlink (9).
Open an existing Bill (e.g. Invoice) from the List of Bills in Batch grid
1. To View and/or Edit an individual Invoice Request in a multiple Billings Batch, click on the desired InvNumber hyperlink in the List of Bills in Batch grid.
2. The 5 x different Billings Type pages generally all have the same main features.
● An Invoice Request serves as example for discussion.
Tasks that can be performed directly from an open Billings page
1. Use the New Bill (Invoice) shortcut to create/add another Bill to the open Batch (1).
● The Batch Number will be the same.
● The Bill (Invoice) Number will be unique.
2. The Save & Close button Saves the new/edited open Bill in its entirety and updates it in the system (2). To ensure that current changes made on the Bill item are saved, you must Save & Close it.
4. You can Delete the current Bill while open (4).
5. You can Print the open Bill (Invoice) from here (5).
6. The Submit/Post button allows for submitting the current batch for Approval from within the open batch (6).
7. Use the Cancel button to exit/close the open Bill, and to cancel any current changes made. Any current changes made will be lost (7).
8. The Custom Narrations section can be found by clicking the Narrations button.

The components of the Invoice Request page as example of any Billings capture page
1. This introduction to the components of an Invoice Request capture page should enable you to capture any Billing Type item. Detailed guidance is given in each specific Process Guide.
2. The capture pages of all Billings Types are divided into five sections:
a. Batch Details (1): This section houses the overall Batch details.
● The Processing Office is hosted in this section.
b. The Bill and Batch values (2):
● The Bill and Batch total amounts accumulate in here as entries are captured, edited and Saved.
c. Debtor Details (3):
● The Billings Office is hosted in this section and defaults to the Processing Office in the Batch Details area, but it can be changed to another.
● Once a Batch is Saved, these fields are fixed and cannot be changed.
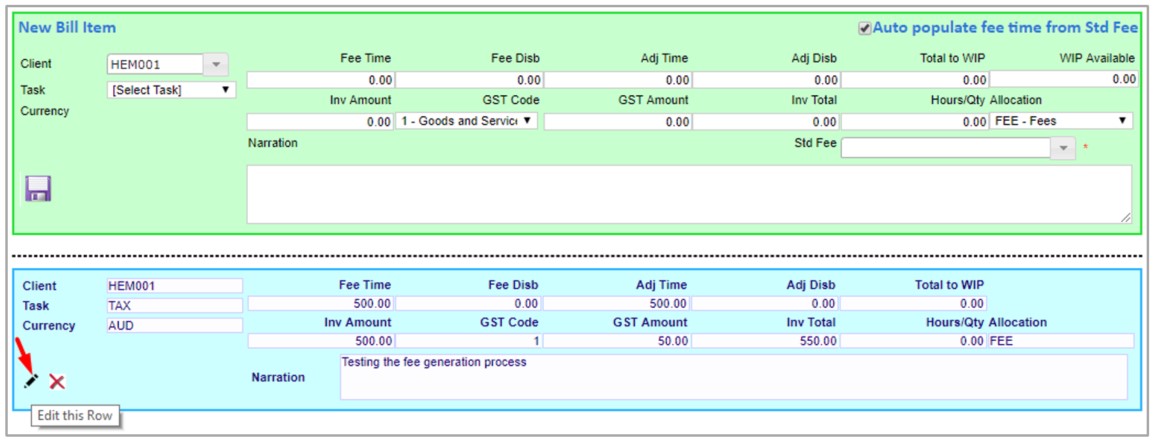
d. New Bill Item (New Reversal Item) (4): This Edit section is shaded in green.
● Capture and Save new entries in this area, or Edit and Save existing ones.
● As an entry is Saved, it is added to the entries at the end of the page and the New Bill Item section becomes available again to capture a next entry, as applicable.
e. Entries per Bill (5): Saved line items/entries are shaded in blue.
● As an entry is Saved, it is added to the entries at the end of the page.
● A Billing item can have a single or multiple line items.
f. The Notes button (6) opens the Notes popup for viewing existing and capturing new Notes.
● The counter indicates whether any Notes exist (> 0).
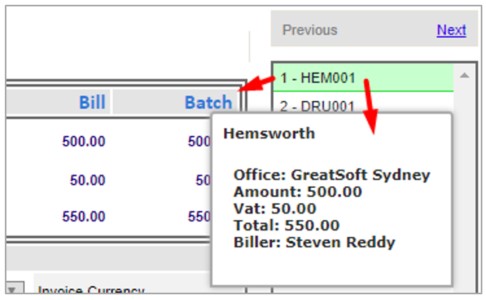
g. Navigation pane (7) with listed Invoice Requests in the currently open multi-Invoice batch.
● The Debtor Client Code identifies each Billing item.
● Use the Next and/or Previous links to open the next or previous bill in the list, or simply select the desired Invoice from the list for viewing and/or editing.

3. The currently displayed Billing item is highlighted in green.
● A Billing item summary displays in a tooltip when you hover across a listed item.
Editing an existing Bill (e.g. Invoice Request)
1. Open an individual Billing item (e.g. Invoice Request) by clicking on the desired InvNumber hyperlink in the List of Bills in Batch grid (multiple Bill Batch), or on the BatchNumber of a single Bill Batch.
2. The same general principles apply to the 5 x different Billings Types.
● An Invoice Request serves as example for discussion (1).
3. To Edit the displayed Invoice Request, click on the Edit button to the left of an individual entry with blue shading.
● While in Edit mode, the entry’s shading changes to green.
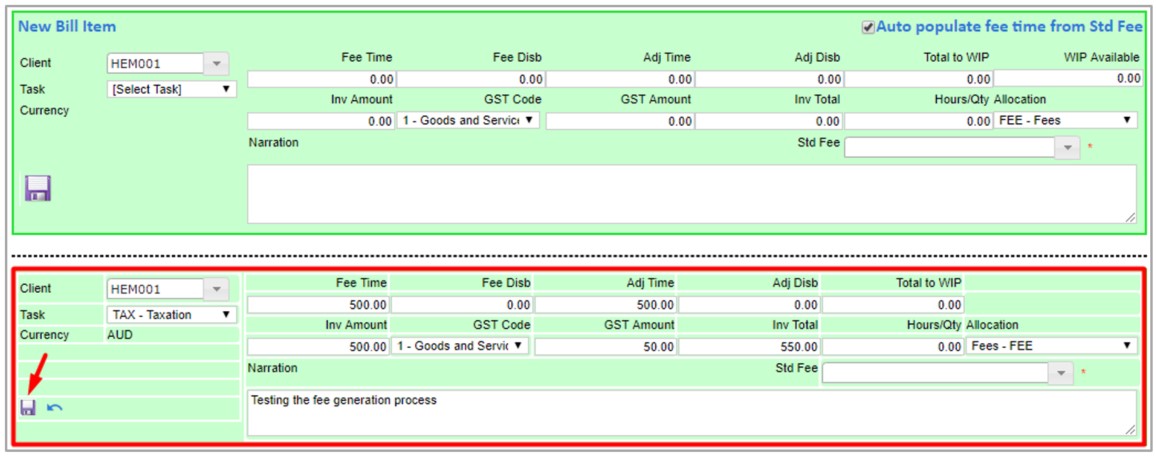
4. Save the changes made by clicking on the Save button of that individual entry.
● After saving, the entry’s shading returns to blue.
NOTE: This Save button only saves the changes made to the specific line entry, but it does not Save the change to the overall Billings item (e.g. Invoice).
NOTE: To update the changes made to the system, remember to Save & Close the Billing item.
5. For detailed information on how to capture the different Billings Types, refer to the relevant capturing Process Guides.
Adding a new Billing Item (e.g. Invoice) to the existing Open Batch
1. Add an additional new Invoice to the existing Batch from the List of Bills in Batch page, by clicking on the New Bill button.
a. Complete the Debtor Details and New Bill Item sections.
● The Batch Details section cannot be edited.
b. To Cancel the new Bill before saving, click on the Cancel button at the top of the page.
● This will return you to the List of Bills in Batch page.
c. To Save the individual entry, click the Save button on the individual Invoice in the green shaded New Bill Item section.
● You can now capture another Invoice line item(s) in the current new Invoice Request to have a multiple entry Invoice, by completing the next New Bill Item that becomes available when you Save an entry.
NOTE: Remember to Save & Close the page to Save the overall Invoice and to update it to the List of Bills in Batch grid.
2. To return to the main Billings page from the List of Bills Batch, either click on any Bill Status link, or click on the Go Back button.